2010年11月12日 星期五

LVM實作


環境準備:
1.新增一個硬碟:(利用VMware測試,使用100M)
*不重開機掃描硬碟方式:
#tail /vat/log/message    //確定沒抓到
#echo "- - -" > /sys/class/scsi-host/host0/scan    //重新掃描scsi硬碟
#tail /var/log/message    //應該就可看到

2.我的裝置為/dev/sdb
#fdisk /dev/sdb     //建立分割區,並設定id為"8e"

LVM相關指令:

PVVGLV
掃描pvscanvgscanlvscan
檢視pvdisplayvgdisplaylvdisplay
新增pvcreatevgcreatelvcreate
移除pvremovevgremovelvremove
放大nonevgextendlvextend
縮小nonevgreducelvreduce

設定:
1.新增一個PV
# pvcreate /dev/sdb1         
  Physical volume "/dev/sdb1" successfully created
# pvscan     //掃描PV
  PV /dev/sdb1                      lvm2 [101.98 MB]
  Total: 1 [101.98 MB] / in use: 0 [0   ] / in no VG: 1 [101.98 MB]
//  PV:/dev/sdb1  格式:lvm2
//PV大小[101.98MB] / 配置給VG的大小   /  沒有配置給VG剩餘大小

2.新增VG     //至少一個PV
# vgcreate mainVG /dev/sdb1
  Volume group "mainVG" successfully created
//指令格式:vgcreate   VGname   pv

# vgscan
  Reading all physical volumes.  This may take a while...
  Found volume group "mainVG" using metadata type lvm2
# pvscan
  PV /dev/sdb1   VG mainVG   lvm2 [100.00 MB / 100.00 MB free]
  Total: 1 [100.00 MB] / in use: 1 [100.00 MB] / in no VG: 0 [0   ]
//可以看到pv已經in use
*可以用display看到更詳細的內容

3.建立LV:     //建立完成後會產生目錄/dev/mainVG,LV會放在裡面
# ls /dev/mainVG            //應該找不到
# lvcreate  -L 50M -n LV01 mainVG
  Rounding up size to full physical extent 52.00 MB
  Logical volume "LV01" created
//指令格式:lvcreate -L size -n lvname VGname
# lvscan
  ACTIVE            '/dev/mainVG/LV01' [52.00 MB] inherit

4.mount LV
#mkfs.ext3 /dev/mainVG/LV01     //格式化LV
#mkdir /dir1
#mount /dev/mainVG/LV01 /dir1
//利用dd快速建立大檔,待會要練習放大縮小
#dd if=/dev/zero of=/dir1/test bs=1M count=10  //size:1M 做10次即為10M檔案

縮放LVM   ##容易造成data lost,請先備份在操作
1.放大 --先放大LV再放大檔案系統
# lvextend -L +30M /dev/mainVG/LV01   
  Rounding up size to full physical extent 32.00 MB
  Extending logical volume LV01 to 84.00 MB
  Logical volume LV01 successfully resized
//指令格式:lvextend -L 總大小/增加的大小:80M/+30M LVpath

//雖然成功但實際上還未變大,可用df檢查
# df |grep -B1 dir1
/dev/mapper/mainVG-LV01
                         51559     15237     33660  32% /dir1

# resize2fs /dev/mainVG/LV01    //放大可不用umount
resize2fs 1.39 (29-May-2006)
Filesystem at /dev/mainVG/LV01 is mounted on /dir1; on-line resizing required
Performing an on-line resize of /dev/mainVG/LV01 to 86016 (1k) blocks.
The filesystem on /dev/mainVG/LV01 is now 86016 blocks long.

[root@a238 dir1]# df |grep -B1 dir1
/dev/mapper/mainVG-LV01
                         83363     15651     63619  20% /dir1
2.縮小 --先縮小檔案系統再縮小LV

增加PV:
1.再增加一個disk:/dev/sdc,同上處理分割區
2.加入VG
# pvcreate /dev/sdc1
  Physical volume "/dev/sdc1" successfully created
# vgextend mainVG /dev/sdc1
  Volume group "mainVG" successfully extended
# pvscan          //可以看出第二顆pv已正確加入mainVG
  PV /dev/sdb1   VG mainVG   lvm2 [100.00 MB / 16.00 MB free]
  PV /dev/sdc1   VG mainVG   lvm2 [100.00 MB / 100.00 MB free]
  Total: 2 [200.00 MB] / in use: 2 [200.00 MB] / in no VG: 0 [0   ]
# vgdisplay
  --- Volume group ---
  VG Name               mainVG
  System ID
  Format                lvm2
  Metadata Areas        2
  Metadata Sequence No  4
  VG Access             read/write
  VG Status             resizable
  MAX LV                0
  Cur LV                1
  Open LV               1
  Max PV                0
  Cur PV                2
  Act PV                2
  VG Size               200.00 MB
  PE Size               4.00 MB
  Total PE              50
  Alloc PE / Size       21 / 84.00 MB
  Free  PE / Size       29 / 116.00 MB
  VG UUID               XK0Mvy-5b4U-pcBB-061Z-0dUJ-SBFR-Ro2yBf

2010年11月11日 星期四

監控web,mail,ftp的工具 -- awstats

相關套件:
awstats-6.95-1.noarch.rpm     //google "awstats"

相關目錄與檔案:
/usr/local/awstats
/etc/awstats
/usr

安裝:
#rpm -ivh awstats-6.95-1.noarch.rpm
...
----- AWStats 6.95 - Laurent Destailleur -----
AWStats files have been installed in /usr/local/awstats

If first install, follow instructions in documentation
(/usr/local/awstats/docs/index.html) to setup AWStats in 3 steps:
Step 1 : Install and Setup with awstats_configure.pl (or manually)
Step 2 : Build/Update Statistics with awstats.pl
Step 3 : Read Statistics

#rpm -ql awstats | less    //查出安裝那些目錄與檔案
//可得知awstats_configure.pl放在/usr/local/awststs/tools下
#cd /usr/local/awststs/tools
# ./awstats_configure.pl
----- AWStats awstats_configure 1.0 (build 1.8) (c) Laurent Destailleur -----
......

-----> Running OS detected: Linux, BSD or Unix

-----> Check for web server install

Enter full config file path of your Web server.
Example: /etc/httpd/httpd.conf
Example: /usr/local/apache2/conf/httpd.conf
Example: c:\Program files\apache group\apache\conf\httpd.conf
Config file path ('none' to skip web server setup):
>/etc/httpd/conf/httpd.conf       //httpd設定檔放置位置
-----> Check and complete web server config file '/etc/httpd/conf/httpd.conf'
  Add 'Alias /awstatsclasses "/usr/local/awstats/wwwroot/classes/"'
  Add 'Alias /awstatscss "/usr/local/awstats/wwwroot/css/"'
  Add 'Alias /awstatsicons "/usr/local/awstats/wwwroot/icon/"'
  Add 'ScriptAlias /awstats/ "/usr/local/awstats/wwwroot/cgi-bin/"'
  Add '' directive
  AWStats directives added to Apache config file.

-----> Need to create a new config file ?
Do you want me to build a new AWStats config/profile
file (required if first install) [y/N] ? y        //yes讓他幫忙修改httpd.conf
-----> Define config file name to create
What is the name of your web site or profile analysis ?
Example: www.mysite.com
Example: demo
Your web site, virtual server or profile name:
> a238.snpy.org            //網站名稱

-----> Define config file path
In which directory do you plan to store your config file(s) ?
Default: /etc/awstats              
Directory path to store config file(s) (Enter for default):
>             //存放awstats設定檔的位置,enter讓他用default就可以了

-----> Create config file '/etc/awstats/awstats.a238.snpy.org.conf'
Error: Failed to open '/usr/local/awstats/wwwroot/cgi-bin/awstats.model.conf' for read.
//error是因為這個版本將awstats.model.conf放在/usr/etc/awstats/下,
//將檔案copy到程式要求的位置再重新執行./awstats_configure.pl 即可

#vim /etc/awstats/awstats.a238.snpy.org.conf   //修改成
#LogFile="/var/log/httpd/mylog.log"
LogFile="/var/log/httpd/access_log"      //要分析的httpd log檔正確名稱

#mkdir /vat/lib/awstats
#cd /usr/local/awstats/wwwroot/cgi-bin/
#perl awstats.pl -update -config=a238.snpy.org   //前面設定的網站名稱

監控mail:
#cd /usr/local/awstats/wwwroot/cgi-bin
#cp awstats.model.conf awstats.mail.conf
#vim awstats.mail.conf    //修改以下內容
LogFile="/usr/local/awstats/tools/maillogconvert.pl standard < /var/log/maillog|"
LogType=M     //Log種類
LogFormat="%time2 %email %email_r %host %host_r %method %url %code %bytesd"    //log_format
SiteDomain="a238.snpy.org"      //mail 域名
...
LevelForBrowsersDetection=0         # 0 disables Browsers detection.
                                    # 2 reduces AWStats speed by 2%
                                    # allphones reduces AWStats speed by 5%
LevelForOSDetection=0               # 0 disables OS detection.
                                    # 2 reduces AWStats speed by 3%
LevelForRefererAnalyze=0            # 0 disables Origin detection.
                                    # 2 reduces AWStats speed by 14%
LevelForRobotsDetection=0           # 0 disables Robots detection.
                                    # 2 reduces AWStats speed by 2.5%
LevelForSearchEnginesDetection=0    # 0 disables Search engines detection.
                                    # 2 reduces AWStats speed by 9%
LevelForKeywordsDetection=0         # 0 disables Keyphrases/Keywords detection.
                                    # 2 reduces AWStats speed by 1%
LevelForFileTypesDetection=0        # 0 disables File types detection.
                                    # 2 reduces AWStats speed by 1%
LevelForWormsDetection=0            # 0 disables Worms detection.
                                    # 2 reduces AWStats speed by 15%
...
ShowMonthStats=HB             //以下為顯示的畫面格式
ShowDaysOfMonthStats=HB
ShowDaysOfWeekStats=HB
ShowHoursStats=HB
ShowDomainsStats=0
ShowHostsStats=HBL
ShowAuthenticatedUsers=0
ShowRobotsStats=0
ShowWormsStats=0
ShowEMailSenders=HBML
ShowEMailReceivers=HBML
ShowSessionsStats=0
ShowPagesStats=0
ShowFileTypesStats=0
ShowFileSizesStats=0
ShowOSStats=0
ShowBrowsersStats=0
ShowScreenSizeStats=0
ShowOriginStats=0
ShowKeyphrasesStats=0
ShowKeywordsStats=0
ShowMiscStats=0
ShowHTTPErrorsStats=0
ShowSMTPErrorsStats=1

#/usr/local/awstats/wwwroot/cgi-bin/awstats.pl -update -config=mail

監控FTP:
#vim /etc/vsftpd/vsftpd.conf     //修改log輸出格式
xferlog_std_format=YES

#cd /usr/local/awstats/wwwroot/cgi-bin
#cp awstats.model.conf awstats.ftp.conf
#vim awstats.ftp.conf
LogFile="/var/log/xferlog"
LogType=F
LogFormat="%time3 %other %host %bytesd %url %other %other %method %other %logname %other %code %other %other"
LogSeparator="\s"
SiteDomain="ftp.a238.snpy.org"
.....
LevelForBrowsersDetection=0         # 0 disables Browsers detection.
                                    # 2 reduces AWStats speed by 2%
                                    # allphones reduces AWStats speed by 5%
LevelForOSDetection=0               # 0 disables OS detection.
                                    # 2 reduces AWStats speed by 3%
LevelForRefererAnalyze=0            # 0 disables Origin detection.
                                    # 2 reduces AWStats speed by 14%
LevelForRobotsDetection=0           # 0 disables Robots detection.
                                    # 2 reduces AWStats speed by 2.5%
LevelForSearchEnginesDetection=0    # 0 disables Search engines detection.
                                    # 2 reduces AWStats speed by 9%
LevelForKeywordsDetection=0         # 0 disables Keyphrases/Keywords detection.
                                    # 2 reduces AWStats speed by 1%
LevelForFileTypesDetection=0        # 0 disables File types detection.
                                    # 2 reduces AWStats speed by 1%
LevelForWormsDetection=0            # 0 disables Worms detection.
                                    # 2 reduces AWStats speed by 15%
....
ShowMenu=1
ShowSummary=UVHB
ShowMonthStats=UVHB
ShowDaysOfMonthStats=HB
ShowDaysOfWeekStats=HB
ShowHoursStats=HB
ShowDomainsStats=HB
ShowHostsStats=PBL
ShowAuthenticatedUsers=HBL
ShowRobotsStats=0
ShowWormsStats=0
ShowEMailSenders=0
ShowEMailReceivers=0
ShowSessionsStats=1
ShowPagesStats=PBEX
ShowFileTypesStats=HB
ShowFileSizesStats=0
ShowOSStats=1
ShowBrowsersStats=0
ShowScreenSizeStats=0
ShowOriginStats=0
ShowKeyphrasesStats=0
ShowKeywordsStats=0
ShowMiscStats=a
ShowHTTPErrorsStats=0
ShowSMTPErrorsStats=0
...
ShowLinksOnUrl=0

#/usr/local/awstats/wwwroot/cgi-bin/awstats.pl -update -config=ftp

測試:
用Browser連接 http://localhost/awstat/awstats.pl?config=a238.snpy.org        //web流量監控
用Browser連接 http://localhost/awstat/awstats.pl?config=mail         //mail監控
用Browser連接 http://localhost/awstat/awstats.pl?config=ftp         //ftp監控

排程更新內容:  
#crontab -e
0 0 * * * /usr/local/awstats/tools/awstats_updateall.pl now > /dev/null   
#設定整點更新,訊息丟棄
*由於awstats是解析log檔內容,故更新時間必須比logrotate要短

Proxy server --squid


相關套件:
squid

相關檔案與目錄:
/etc/squid/squid.conf
/var/spool/squid     //網頁暫存區

Squid預設值:
http-port    3128    //使用的port
//cache-dir  ufs   /vat/spool/squid   最大空間    第一層目錄數  第二層目錄數
cache-dir   ufs    /var/spool/squid    100        16              256
cache-mem    8MB     //預設快取
cache_log     /var/log/squid/....
access_log     /var/log/squid/....
//存取規則
http_access  allow    acl名稱
http_access deny    acl名稱

設定:
#vim /etc/squid/squid.conf    //增加一個acl名稱
acl   our_networks src  140.137.215.0/24
http_access allow  our_networks

#/etc/init.d/squid restart

測試:
1.先觀察/var/spool/squid
# du --max-depth=1 /var/spool/squid/
1028    /var/spool/squid/08
1028    /var/spool/squid/00
1028    /var/spool/squid/0E
1028    /var/spool/squid/07
1028    /var/spool/squid/09
....
16460   /var/spool/squid/

2.用browser設定proxy指向server後,隨便連一個網頁

3.在觀察/var/spool/squid是否有變化
# du --max-depth=1 /var/spool/squid/
1028    /var/spool/squid/08
1480    /var/spool/squid/00
1028    /var/spool/squid/0E
1028    /var/spool/squid/07
1028    /var/spool/squid/09
....
16912   /var/spool/squid/

可再用另一個瀏覽器讀取同一網頁看是否有變快

檢視記錄檔:
1./var/log/squid/cache.log
//squid啟動時的log

2./var/log/squid/access.log
 //紀錄server存取網頁紀錄

3./var/log/squid/store.log
//紀錄網頁資料存放位置與client端讀取網頁log
進階設定:
1.設定不可連線的網頁:
#vim /etc/squid/badsites.squid     //檔名自取,內容為網址
www.ibm.com          //阻擋連結ibm網址
.ubuntu-tw.org        //阻擋連結domain:ubuntu-tw.org

#vim /etc/squid/squid.conf   //加入
acl badsites dstdomain "/etc/squid/badsites.squid"

http_access deny badsites

*定義區需在http_access前,而http_access需放在該區前面,以免有符合其他條件而未處理

利用joomla快速架站

1.相關套件:
httpd or apache
php*           //記得裝sql模組
mysql*
Joomla_1.5.22-Stable-Full_Package.zip   //到www.joomla.org下載zip檔
zh-TW.administrator.1.5.17v1.zip    //管理者中文介面
zh-TW.site.1.5.17v1.zip       //網站中文介面

2.解壓縮:
先建立目錄
#mkdir joomla
#unzip Joomla_1.5.22-Stable-Full_Package.zip -d joomla   //指定解壓目錄
#mkdir joomla/language/zh-TW                 //先把語系相關目錄準備好
#mkdir joomla/administrator/language/zh-TW
#unzip zh-TW.administrator.1.5.17v1.zip -d mkdir joomla/administrator/language/zh-TW
#unzip zh-TW.site.1.5.17v1.zip -d joomla/language/zh-TW
#mv joomla /opt/           //將目錄搬到要放置的位置

3.建立資料庫:
#mysql -u root -p
>create database joolma;
>grant all on joomla.* to admin@localhost identified by 'XXXXXXX' ;   //設置管理帳號

4.設定apache:           
#vim /etc/httpd/conf/httpd.conf    //利用alias指向
alias  /joomla  "/opt/joomla"

or
#vim /etc/httpd/conf/httpd.conf     //利用虛擬主機方式,適合做首頁方式

    DocumentRoot /opt/joomla
    ServerName www.a238.snpy.org

or
直接將檔案放在/var/www/html中

#/etc/inir.d/httpd restart

5.開始安裝:
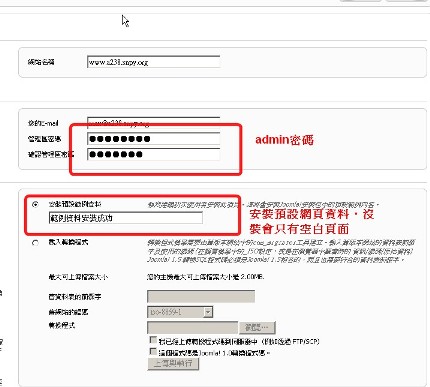
用Browser連接 http://localhost/joomla    //基本上就照圖片順序處理

下圖為檢查機制,應該要都為"是",出現"否"請根據問題處理

下圖為sql主機資訊,本範例用MySQL並位於localhost

注意設定帳號admin的密碼,記得安裝預設資料


看到這個頁面時代表安裝已完成,故要移除安裝檔案
#cd /opt/joomla    //進入joomla目錄
#rm -rf installation         //移除安裝目錄

基本安裝完成,接下來就可以根據需求修改內容

2010年11月8日 星期一

NIS server


1.相關套件:
yp-tools-2.9-1.el5       //server,client都須裝
ypbind-1.19-12.el5        //server,client都須裝
ypserv.i386 0:2.19-5.el5        //server須裝

2.相關檔案與目錄:
/etc/ypserv.conf
/etc/hosts
/etc/sysconfig/network
/var/yp/
/etc/nsswitch.conf         //client
/etc/yp.conf              //client

3.環境設定:
Server:     //由於設定nis不能使用ip,崓稱解析須正常
設定Nisdomainame:
# nisdomainname marcus
#vim /etc/sysconfig/network     //為了開機生效,加入
NISDOMAIN=marcus

#vim /etc/hosts      //加入
127.0.0.1     ......................    master.marcus     //讓本機名稱解析正常
140.137.215.238     master.marcus
192.168.213.112     client.marcus       //client端資料
Client:      //設定正確的nis主機名稱與IP
#vim /etc/hosts    //加入名稱解析
127.0.0.1   .......................   client.marcus
192.168.213.100     master.marcus

4.NIS設定:
#vim /etc/ypserv.conf      //將最後一行註解與空白取消
*                        : *       : *                : none

#/etc/init.d/ypserv restart      //啟動服務
# /etc/init.d/yppasswdd restart       //啟動密碼服務

# rpcinfo -p     //確認是否正常啟動
    100004    2   udp    716  ypserv
    100004    1   udp    716  ypserv
    100004    2   tcp    719  ypserv
    100004    1   tcp    719  ypserv
    100009    1   udp    728  yppasswdd

# /usr/lib/yp/ypinit -m    //建立nis map檔(資料庫格式),將server帳號資料放到/var/yp/marcus 下
                                 //做完後帳號有修改要重做一次,yppasswd可以改密碼
At this point, we have to construct a list of the hosts which will run NIS
servers.  a238.snpy.org is in the list of NIS server hosts.  Please continue to add
the names for the other hosts, one per line.  When you are done with the
list, type a <control D>.
        next host to add:  a238.snpy.org
        next host to add:  master.marcus      //輸入網域名稱
        next host to add:          //可在加另一個網域,用ctrl+D來離開
The current list of NIS servers looks like this:

a238.snpy.org
master.marcus

Is this correct?  [y/n: y]  y
We need a few minutes to build the databases...
Building /var/yp/marcus/ypservers...
Running /var/yp/Makefile...
gmake[1]: Entering directory `/var/yp/marcus'
Updating passwd.byname...
Updating passwd.byuid...
Updating group.byname...
Updating group.bygid...
Updating hosts.byname...
Updating hosts.byaddr...
Updating rpc.byname...
Updating rpc.bynumber...
Updating services.byname...
Updating services.byservicename...
Updating netid.byname...
Updating protocols.bynumber...
Updating protocols.byname...
Updating mail.aliases...
gmake[1]: Leaving directory `/var/yp/marcus'

a238.snpy.org has been set up as a NIS master server.

Now you can run ypinit -s a238.snpy.org on all slave server.

# ypcat -h localhost passwd.byname    //可檢查是否正常運作,會show出帳號資料

*注意防火牆iptables規則
5測試:
在client 端用ypcat測試:
# ypcat -h master.marcus passwd.byname   //看有無server端帳號資料
#setup  --> 認證設定  -->  勾選"使用NIS"      //如果使用DHCP取得IP,
網域名稱:marcus                                           //須注意DHCP srv在dhcpd.conf中有沒設定正確nisdomain
伺服器:192.168.213.100
#cat /etc/yp.conf
domain a238 server 192.168.213.100

#cat /etc/nsswitch.conf
passwd:     files nis
shadow:     files nis
group:      files nis

hosts:      files nis dns
...

*如果有問題可能開機後不能登入,就只能用single user mode來修正
*重開機後,nisdomainname設定可能會失效,可在/etc/rc.local加上
/bin/nisdomainname marcus

DHCP


1.相關套件:
dhcp.i386

2.相關目錄與檔案:
/etc/dhcpd.conf
/var/lib/dhcpd/              //放租約記錄檔
/usr/share/doc/dhcp-3.0.5/dhcpd.conf.sample

3.設定:
安裝好dhcp套件後,設定檔/etc/dhcpd.conf沒有內容
要拷貝/usr/share/doc/dhcp-*/dhcpd.conf.sample來改      //dhcp-*表示安裝的版號
#cp /usr/share/doc/dhcp-3.0.5/dhcpd.conf.sample /etc/dhcpd.conf
#vim /etc/dhcpd.conf      //修改為
ddns-update-style interim;
ignore client-updates;

subnet 192.168.213.0 netmask 255.255.255.0 {      //網段名稱

# --- default gateway
        option routers                  192.168.213.2;        // default gateway
        option subnet-mask              255.255.255.0;

        option nis-domain               "marcus";       //如果DHCP+NIS則須給正確值,否則client重開機會被覆蓋掉
        option domain-name              "marcus.com";
        option domain-name-servers      168.95.1.1;     //DNS server IP

        option time-offset              -18000; # Eastern Standard Time     //目前時區與格林威治的差值

        range dynamic-bootp 192.168.213.111 192.168.213.112;        //發放IP區段,練習用只發111,112
        default-lease-time 21600;          //租約時間
        max-lease-time 43200;           //最大租用時間

        # we want the nameserver to appear at a fixed address   //用來設定固定IP
        host ns {
                next-server marvin.redhat.com;
                hardware ethernet 12:34:56:78:AB:CD;
                fixed-address 207.175.42.254;
        }
}


4.啟動與測試:
Server端:
#/etc/init.d/dhcpd restart

到client端測試:
Linux:
#dhclient eth0
#tail /var/log/message |grep dhclient

Windows:
將網卡設為自動取得IP,在修復讓他去抓

2010年11月5日 星期五

基本iptables規則

研究了一下iptables,寫了一個基本的iptables規則,並寫成script
可在開機時執行

#!/bin/bash

modprobe ip_tables
modprobe ip_conntrack
modprobe ip_conntrack_ftp
modprobe ip_nat_ftp

#清空
iptables -F -t filter
iptables -t nat -F
iptables -X
iptables -t nat -X
iptables -F

#NAT setting
iptables -t nat -P POSTROUTING ACCEPT
iptables -t nat -P PREROUTING ACCEPT
iptables -t nat -A POSTROUTING -o eth0 -s 192.168.188.5 -j SNAT --to 140.137.215.188
iptables -t nat -A POSTROUTING -o eth0 -s 192.168.188.0/24 -j MASQUERADE
iptables -t nat -A POSTROUTING -o eth0 -s 192.168.238.0/24 -j MASQUERADE
iptables -t nat -A PREROUTING -i eth0 -d 140.137.215.188 -j DNAT --to 192.168.188.5

#Default policy setting
iptables -P INPUT DROP
iptables -P OUTPUT ACCEPT
iptables -P FORWARD ACCEPT

#允許lo介面
iptables -A INPUT -i lo -j ACCEPT

#ssh
iptables -A INPUT -p tcp --dport 22 -j ACCEPT
iptables -A INPUT -p udp --dport 22 -j ACCEPT

#www
iptables -A INPUT -p tcp --dport 80 -j ACCEPT
#iptables -t nat -A PREROUTING -i eth0 -p tcp --dport 80 -j DNAT --to 192.168.1.7    #將連到80port轉給另一台主機

#smtp,pop3,icmp...
iptables -A INPUT -p tcp --dport 25 -j ACCEPT
iptables -A INPUT -p tcp --dport 110 -j ACCEPT
iptables -A INPUT -p tcp --dport 143 -j ACCEPT
iptables -A INPUT -p tcp --dport 993 -j ACCEPT
iptables -A INPUT -p tcp --dport 995 -j ACCEPT
#iptables -t nat -A PREROUTING -i eth0 -p tcp --dport 25 -j DNAT --to 192.168.1.6    #將連到25port轉給另一台主機

#DNS
iptables -A INPUT -p udp --dport 53 -j ACCEPT

#samba
iptables -A INPUT -p tcp --dport 137 -j ACCEPT
iptables -A INPUT -p tcp --dport 138 -j ACCEPT
iptables -A INPUT -p tcp --dport 139 -j ACCEPT
iptables -A INPUT -p tcp --dport 445 -j ACCEPT

#rsync --一班rsync走ssh:22,故不須開通873
#iptables -A INPUT -p tcp ! -i eth0 --dport 873 -j ACCEPT
#iptables -A INPUT -p udp ! -i eth0 --dport 873 -j ACCEPT

#icmp
iptables -A INPUT -p icmp -j ACCEPT

#自訂一個鍊other
iptables -N other

#規則
iptables -A other -m state --state ESTABLISHED,RELATED -j ACCEPT  #允許建立連線與回應的封包通過

#將INPUT,OUTUT,FORWARD表格其餘未設定封包皆由other鍊規則處理
iptables -A INPUT -j other
iptables -A OUTPUT -j other
iptables -A FORWARD -j other

2010年11月4日 星期四

Samba 網路芳鄰


1.相關套件:
samba-client-3.0.33-3.28.el5
samba-common-3.0.33-3.28.el5
samba-3.0.33-3.28.el5

2.設定檔: 
#vim  /etc/samba/smb.conf
[global]        //全域設定,這邊的設定是關於整個samba server
       workgroup = MYGROUP
       server string = Samba Server Version %v
       security = user      //預設為user
                  //可設定share,user,server,domain,ads等
       passdb backend = tdbsam
//到下一個[home]前都是[global]相關設定區塊
[home]   //登入後會看到家目錄
 
        comment = Home Directories
        browseable = no 
        writable = yes

[tmp]      //設定分享的目錄
        comment = tmp file    //註解區內容
        path = /tmp     //要分享的目錄
        writable = no   //唯讀,同 read only = yes
        public = yes    //公開讓別人看到
        hosts allow = 140.137.215.89    //這兩行表示拒絕所有連線,
        hosts deny = 0.0.0.0/0                 //僅允許89那台主機使用這個目錄
        valid users = max    //僅user: max可以讀取,群組用@group

#testparm    //用來測試smb.conf有無格式或文字上的錯誤
#/etc/init.d/smb restart

3.測試:
用windows測試:(ip:140.137.215.89)
在執行打\\ip\目錄即可,但如果要測試很多人的帳號密碼
由於windows會記得登入資訊一段時間,可輸入
c:\>net use * /del /y     //清除資訊

用linux測試:(ip:140.137.215.238)
# smbclient -L //140.137.215.238 -U max
Password:
Domain=[A238] OS=[Unix] Server=[Samba 3.0.33-3.28.el5]

        Sharename       Type      Comment
        ---------       ----      -------
        www             Disk      www file
        IPC$            IPC       IPC Service (Samba Server Version 3.0.33-3.28.el5)
        max             Disk      Home Directories
Domain=[A238] OS=[Unix] Server=[Samba 3.0.33-3.28.el5]

        Server               Comment
        ---------            -------

        Workgroup            Master
        ---------            -------
        MYGROUP

# smbclient  //140.137.215.238/www -U max
Password:
Domain=[A238] OS=[Unix] Server=[Samba 3.0.33-3.28.el5]
tree connect failed: NT_STATUS_ACCESS_DENIED
//因為有設定僅ip:140.137.215.89可以連線

4.情境實作:
建立一個目錄/opt/boss,只提供帳號zoe使用,資源名稱為storage
ans:
#mkdir /opt/boss
#chown zoe. /opt/boss
#chmod 700  /opt/boss
#vim /etc/samba/smb.conf    //加入
[storage]
        comment = boss storage
        path = /opt/boss
        writable = yes
        public = no
        valid users = zoe    //僅允許zoe使用
        browseable = no    //不會list
#/etc/init.d/smb restart

建立一資源名稱為webproject,供webuser組的所有帳號存取,目錄為/opt/project
ans:
# mkdir /opt/project
# chown :webuser /opt/project
# chmod 770 /opt/project
# vim /etc/samba/smb.conf
[webproject]
        comment = webproject storage
        path = /opt/project
        writable = yes
        public = no
        valid user = @webuser    //表群組
        browseable = no


Linux SendMail OpenWebMail


1.相關套件:
Sendmail
perl
openwebmail

2.安裝套件:
在安裝系統時已將perl跟sendmail安裝完成,但openwebmail在centos官方yum server上並沒有
必須自己到openwebmail上取得,可google "openwebmail yum repo"有教學

設定好openwebmail.repo後
#yum search openwebmail
================================ Matched: openwebmail ================================
openwebmail.i386 : Open Webmail 2.30
openwebmail-data.i386 : openwebmail data package


#yum install openwebmail       #會有錯誤訊息
openwebmail-2.53-3.i386 from openwebmail has depsolving problems
  --> Missing Dependency: perl-Text-Iconv is needed by package openwebmail-2.53-3.i386 (openwebmail)
遇到這問題到openwebmail網站去找這個套件,下載下來用rpm安裝
#rpm -ivh http://套件網址    #rpm可直接安裝網路上的檔案
#yum install openwebmail    #如還有其他錯誤訊息要處理掉
3.初始化openwebmail
#rpm -ql openwebmail     #可觀察到程式安裝於/var/www/cgi-bin/openwebmail下
#cd /var/www/cgi-bin/openwebmail
#./openwebmail-tool.pl --init     //做openwebmail初始化

creating db /var/www/cgi-bin/openwebmail/etc/maps/b2g ...done.
creating db /var/www/cgi-bin/openwebmail/etc/maps/g2b ...done.
creating db /var/www/cgi-bin/openwebmail/etc/maps/lunar ...done.

Creating UTF-8 locales...
langconv ar_AE.CP1256 -> ar_AE.UTF-8
langconv ar_AE.ISO8859-6 -> ar_AE.UTF-8
langconv bg_BG.CP1251 -> bg_BG.UTF-8
langconv ca_ES.ISO8859-1 -> ca_ES.UTF-8
langconv cs_CZ.ISO8859-2 -> cs_CZ.UTF-8
langconv da_DK.ISO8859-1 -> da_DK.UTF-8
langconv de_DE.ISO8859-1 -> de_DE.UTF-8
langconv el_GR.ISO8859-7 -> el_GR.UTF-8
langconv en_US.ISO8859-1 -> en_US.UTF-8
langconv es_AR.ISO8859-1 -> es_AR.UTF-8
langconv fi_FI.ISO8859-1 -> fi_FI.UTF-8
langconv fr_FR.ISO8859-1 -> fr_FR.UTF-8
langconv he_IL.CP1255 -> he_IL.UTF-8
langconv hr_HR.ISO8859-2 -> hr_HR.UTF-8
langconv hu_HU.ISO8859-2 -> hu_HU.UTF-8
langconv id_ID.ISO8859-1 -> id_ID.UTF-8
langconv it_IT.ISO8859-1 -> it_IT.UTF-8
langconv ko_KR.eucKR -> ko_KR.UTF-8
langconv lt_LT.CP1257 -> lt_LT.UTF-8
langconv nl_NL.ISO8859-1 -> nl_NL.UTF-8
langconv no_NO.ISO8859-1 -> no_NO.UTF-8
langconv pl_PL.ISO8859-2 -> pl_PL.UTF-8
langconv pt_BR.ISO8859-1 -> pt_BR.UTF-8
langconv pt_PT.ISO8859-1 -> pt_PT.UTF-8
langconv ro_RO.ISO8859-2 -> ro_RO.UTF-8
langconv ru_RU.KOI8-R -> ru_RU.UTF-8
langconv sk_SK.ISO8859-2 -> sk_SK.UTF-8
langconv sl_SI.CP1250 -> sl_SI.UTF-8
langconv sr_CS.ISO8859-2 -> sr_CS.UTF-8
langconv sv_SE.ISO8859-1 -> sv_SE.UTF-8
langconv th_TH.TIS-620 -> th_TH.UTF-8
langconv tr_TR.ISO8859-9 -> tr_TR.UTF-8
langconv uk_UA.KOI8-U -> uk_UA.UTF-8
...done.

Welcome to the OpenWebMail!

This program is going to send a short message back to the developer,
so we could have the idea that who is installing and how many sites are
using this software, the content to be sent is:

OS: Linux 2.6.18-194.el5 i686
Perl: 5.008008
WebMail: OpenWebMail 2.53 20080123

Send the site report?(Y/n) n

Thank you.

#/etc/init.d/httpd restart    //重啟apache

用browser連上http://ip or 網址/webmail應可看到登入畫面

4.Openwebmail相關設定:
#vim /var/www/openwebmail/etc/openwebmail.conf
//修改預設語系
#default_language                en
default_language                zh_TW.utf8

//修改icon變中文版本
#default_iconset                Cool3D.English
default_iconset                 Cool3D.Chinese.Traditional

//更換登入時的logo與連結
#logo_url                        %ow_htmlurl%/images/openwebmail.gif
#logo_link                       http://openwebmail.org
//根據%ow_htmlurl%設定,圖檔應放置在/var/www/data/openwebmail/images
logo_url                        %ow_htmlurl%/images/marcus.gif
logo_link                       http://www.a238.snpy.org

2010年11月1日 星期一

Sendmail相關設定


Sendmail收信設定:
1.相關套件:
    sendmail
    m4
    sendmail-cf

2.相關檔案:
     /etc/mail             // 設定檔所在
     /var/log/mail        // log紀錄
     /var/spool/mail     // 系統收到信,user未收取的mail存放區

3.DNS設定:
     #vim /var/named/chroot/var/named/named.snpy238  //修改資源設定檔,加入MX與A紀錄
@              IN      A       140.137.215.238
@               IN      MX 10   @


4.#/etc/init.d/sendmail restart/stop/start  // 服務啟停
   #netstat -ntupl    // 查看port:25有無開啟
   #setup  or  iptables   //設定防火牆

   測試:
   #telnet localhost 25   測試sendmail有無正確啟動
   #telnet 140.137.215.238 25  用自己的外部ip測試,預設只開啟localhost 使用

5. #cd /etc/mail
   #vim sendmail.mc
   找到DAEMON_OPTIONS(`Port=smtp,Addr=127.0.0.1, Name=MTA')dnl
         //將127.0.0.1改為0.0.0.0,表示接受所有連線
  #m4 sendmail.mc > sendmail.cf   //編譯mc檔並取代原有設定檔
  #vim local-host-names  //加入
       a238.snpy.org      //讓sendmail知道負責哪一個mail domain
  #/etc/init.d/sendmail restart

sendmail送信設定(Relay):
1.使用mail指令應已可收發信,但會有限制,預設並未啟動relay功能
2.使用telnet 測試是否只收寄給localhost的信
   利用一台windows or 另一台linux
   #telnet 140.137.215.238 25
220 localhost.localdomain ESMTP Sendmail 8.13.8/8.13.8; Mon, 1 Nov 2010 21:44:33 +0800
EHLO localhost         //跟SMTP溝通
250-localhost.localdomain Hello [140.137.215.89], pleased to meet you
250-ENHANCEDSTATUSCODES
250-PIPELINING
250-8BITMIME
250-SIZE
250-DSN
250-ETRN
250-DELIVERBY
250 HELP
MAIL FROM: max@max.com    //從哪裡來,可以隨便打,以ip為準
250 2.1.0 max@max.com... Sender ok
RCPT to: maxplayerr@gmail.com     //要寄給誰,這是外部gmail的帳號,故需Relay才可以
550 5.7.1 maxplayerr@gmail.com... Relaying denied. IP name lookup failed [140.137.215.89]

3.啟用Relay功能
   #vim /etc/mail/access    //加入
     140.137.215.89      RELAY     //表示接受140.137.215.89過來的轉送要求
     140.137.215          RELAY     //表示接受140.137.215.0/24網段過來的轉送要求,設定此行上一行可以拿掉
   #makemap -v hash access.db < access //將access檔案內容寫入db檔案
   #/etc/init.d/sendmail restart
再利用windows telnet測試
220 localhost.localdomain ESMTP Sendmail 8.13.8/8.13.8; Mon, 1 Nov 2010 21:59:27 +0800
EHLO localhost
250-localhost.localdomain Hello [140.137.215.89], pleased to meet you
250-ENHANCEDSTATUSCODES
250-PIPELINING
250-8BITMIME
250-SIZE
250-DSN
250-ETRN
250-DELIVERBY
250 HELP
mail from     //打錯,在此模式下打錯字要重頭再打
501 5.5.2 Syntax error in parameters scanning "from"
mail from: max@a238.snpy.org
250 2.1.0 max@a238.snpy.org... Sender ok
rcpt to: maxplayerr@gmail.com
250 2.1.5 maxplayerr@gmail.com... Recipient ok
data   //輸入mail內容
354 Enter mail, end with "." on a line by itself
12345678
.       //mail結尾
250 2.0.0 oA1DxRqV005036 Message accepted for delivery
完成後可以到gmail去收信,看是否有正常relay
啟用SMTP認證:
1.相關套件:
cyrus-sasl-plain
cyrus-sasl
cyrus-sasl-lib
cyrus-sasl-md5

2.修改設定檔:
  #vim /etc/mail/sendmail.mc   //將下兩行註解dnl與空格拿掉,即第一個字元前面沒有空格
      TRUST_AUTH_MECH(`EXTERNAL DIGEST-MD5 CRAM-MD5 LOGIN PLAIN')dnl
      define(`confAUTH_MECHANISMS', `EXTERNAL GSSAPI DIGEST-MD5 CRAM-MD5 LOGIN PLAIN')dnl
  #m4 sendmail.mc > sendmail.cf
  #/etc/init.d/saslauthd restart
  #/etc/init.d/sendmail restart

3.測試:
   #telnet localhost 25
Trying 127.0.0.1...
Connected to localhost.localdomain (127.0.0.1).
Escape character is '^]'.
220 localhost.localdomain ESMTP Sendmail 8.13.8/8.13.8; Mon, 1 Nov 2010 22:58:59 +0800
ehlo localhost
250-localhost.localdomain Hello localhost.localdomain [127.0.0.1], pleased to meet you
250-ENHANCEDSTATUSCODES
250-PIPELINING
250-8BITMIME
250-SIZE
250-DSN
250-ETRN
250-AUTH GSSAPI DIGEST-MD5 CRAM-MD5 LOGIN PLAIN  //出現這兩個即成功
250-DELIVERBY
250 HELP


Alias: 用途在設定帳號別名,可降低被猜密碼的機率,也可設定某些特定帳號的mail給其他負責人收,如sales,services等
1.設定檔:
    /etc/aliases

2.修改設定檔:
   #vim /etc/aliases    //根據格式加入
     sales:           max              //將寄給sales@a238.snpy.org的信交由max來收
   #newaliases     //讓alias生效
 3.測試:
   用其他mail去寄信給sales@a238.snpy.org,再用max去收信看有沒取得sales的信

Dovecot: 讓outlook(MUA:Mail User Agent)等軟體可透過pop3等port來主機收信
1.相關套件:
     dovecot

2.相關檔案:
     /etc/dovecot  //設定檔

3.#/etc/init.d/dovecot restart/stop/start  // 服務啟停
   #netstat -ntupl    // 查看port:110,143,995,993有無開啟,可根據需求將其他port關閉
   #setup  or  iptables   //設定防火牆

4.設定outlook看是否能收信

**如果寄信一直有問題會被退,記得去看/var/log/maillog,也可能是hostname設定不正常。